The Butter Gun
I’m not saying I do, but I am not saying that I do not. In my home, on my breakfast table, I may, or I may not have a gun that shoots butter. If I did have such a thing, it would have a large plastic bellows that you could slam your fist down onto. It would have a little round tank filled with liquid butter, and it would have a nozzle that sprays the butter across the table at the toast.
After careful experimentation and calibration, suppose that I determined that each blast of butter could coat one piece of toast from a distance of twelve inches.
Always wanting to improve a good design, I made a discovery. If I move the toast backwards to twenty-four inches from the gun, the cone of butter would spread both wider and taller. I could now coat a total of four pieces of toast.
Ambition, and a love of toast, led to the inevitable next step. At a distance of thirty-six inches, I was able (with a single blast of butter!) to coat NINE pieces of toast!
Normally for me, more toast equals more awesome. However, there is a serious downside to this. With this setup, each piece of toast only receives one-ninth of the total butter sprayed.
In this model, the butter is behaving just like light, We move the toast back from one-foot, to two-feet, to three-feet, and the total butter goes down from full to 1/4 to only 1/9.
The total butter hitting that toast is one over the distance squared . Two feet gives us 1/(2×2) = 1/4. Three feet gives us 1/(3×3) = 1/9 of the butter. It’s not critical that anyone do this math on a regular basis, but we all need to understand this: Projectors and lighting instruments are designed to produce an area of light up to a given size. When you go larger than that, the usefulness of the light starts to go down at an exponential rate.
That’s all of the math we need to do here, so scroll on down, and let’s look at how this applies to projections on a stage.
Choosing the best arrangement of projectors
In January of 2012, I designed the scenery and projections for an original production based on the Hans Christian Anderson story, The Wild Swans. This particular set included a projection screen that was proportionally much wider than a standard screen, compared to it’s height.

At this time at my institution, the projectors I had access to included a large number of fairly ordinary 3000 lumen classroom projectors, and one 6000 lumen projector that was used on campus for special purposes. I knew we could do this without renting anything. The question was whether or not to use the 6000 lumen projector. Anyone I spoke with who knew about the equipment we had available took it as a foregone conclusion that we would use the brightest unit.
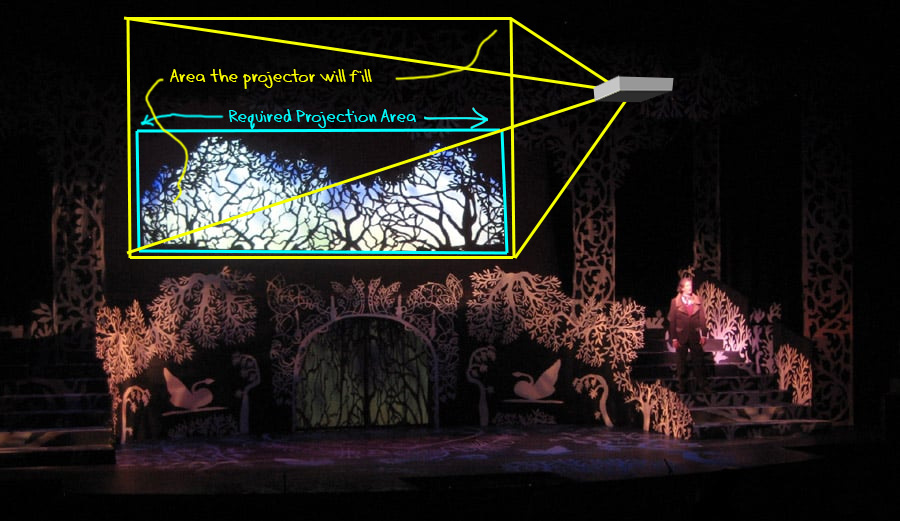
An important thing to think about when installing projectors is that a projector has a typical rectangle it will fill. No matter how you adjust the settings or the aspect ratio, you will only be rejecting the use of part of the projector’s field. In order to use one 6000 lumen projector to cover this screen, we would have to choose to use either the top half, or the bottom half, or the middle half of the available field. No matter what we did, we would only be using half of the total light coming out of this projector. We would in fact be making use of about 3000 lumens, and rejecting the other 3000.
Instead of the single 6000 lumen projector, I opted for two cheaper, simpler, and dimmer units that each put out 3000 lumens. By mounting them so that each one covered half of the screen, we used all of the light coming out of each. By choosing the cheaper, dimmer projectors, we were able to make more efficient use of the available light, and ended up with an image that was twice as bright as what the brighter projector would have provided.
Getting two projectors to work together like this takes a little bit of know-how (but not too much). Depending on what you are using to control your media, there are several ways that you can do this. One of the next articles in this series will be about exactly this.
Can’t I just use brighter projectors?
You bet! However, the cost of projectors goes up in a steep curve as they get brighter. The more a given model is manufactured, the less it costs. Super-bright and versatile projectors are specialty items. They are not mass-produced in the same numbers that the simpler projectors are – and this makes them cost a lot more. Instead of hundreds of dollars, really good large-venue projectors cost tens of thousands of dollars
For a great many small theatres and educational institutions, simple off-the-shelf units are the only realistic equipment available . The good news is that with a little technique, you can get amazing functionality out of basic classroom and conference-room projectors.
It is easy to think of the ordinary projectors we use day-to-day as not-good-enough for our shows. I can easily think back little over twenty years when we first started to use video projectors instead of 33mm slide projectors on stage. We did all kinds of back-flips to accommodate the things. They were only putting out about 1000 lumens back then. We would carefully arrange the set, plan the lighting, scale the size of the screen, and choose the projection screen material to get the most out of our technology.
All of that technique still applies to day. There is a world of tricks that you can employ to increase the quality of your projections when you have to stick with the projectors that you have, rather than the projectors that you want.
Protecting your projections from the stage lights
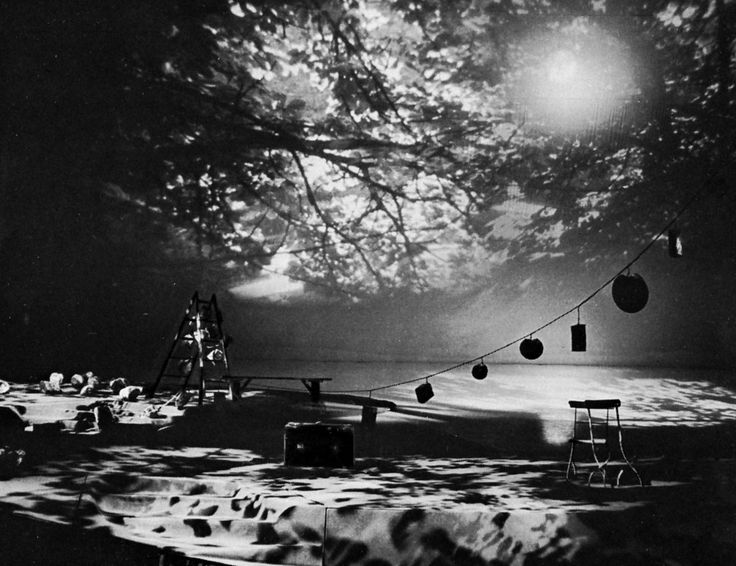
Projections on stage go back to the 1800s, though the way we think of them being used today in performance really goes back to the mid-1900s. A frequently cited designer is Josef Svoboda (1920-2002), a Czech artist who worked prominently at the Laterna Magika in Prague. He studied under Frantisek Troster (1904–1968), and expanded their common design approach to include spectacular levels of shadow-play and projection on stage, as well as introducing atmospheric haze. Before digital media or video projections, large format glass slides were being used in 500 lumen projectors to paint an entire stage. 16mm film was being used to project on screens made of experimental materials, such as white elastic bands and glass beads. Amazing levels of ingenuity were engaged using traditional stagecraft to allow projected illusions to compete successfully with stage lights in support of live performance. These effects were beautiful. Our most basic technology today is enormously more powerful and versatile. We should be able to do anything we want. However, access to better technology, in some ways, makes us lazy. Too many times we don’t try to solve the problems with our brains. Instead, we want to solve the problems with our budgets. That projection isn’t reading clearly? We need a better projector!
In 2011, I sat in on a panel discussion at the Prague Quadrennial inside the original Laterna Magika Theatre in Prague. The panel was composed of many people who had worked with Svoboda and Troster in earlier years. One of the subjects that came up in conversation was how they worked so successfully with projections in the days of analog media. The most crucial takeaway from this conversation was that they had precise control of where the light on stage was going. In that era, there was no computer-controlled lighting. In order to put the light exactly where they wanted it, they often used large numbers of human followspot operators instead of static instruments. They used other tricks as well, such as covering large parts of the floor with black carpet to minimize reflected stage lights.
Lighting direction is critical
Every digital projector has a property called “contrast ratio.” It is comparison between the unit’s brightest white to the darkest black that it can produce. Old video projectors might only have a 500:1 contrast ratio. Projectors using newer technologies achieve contrast ratios of 5000:1 or even much better. Brightness is important, but contrast is just as important, if not more. The human eye will see things as more bright and clear if the contrast is bolder. If your blacks are not really black, but just sort of gray, the image will never look quite like you want it to.

Your stage lights can completely defeat the contrast of your images. When they hit the screen, all of the blacks fill in with the stage lights and your contrast goes away.
Having the stage lights hit the screen directly is, of course, the worst. Even a little spill or light that bounces off of the floor can ruin an effect that you are going for. Getting stage lights to work with projections takes some planning.
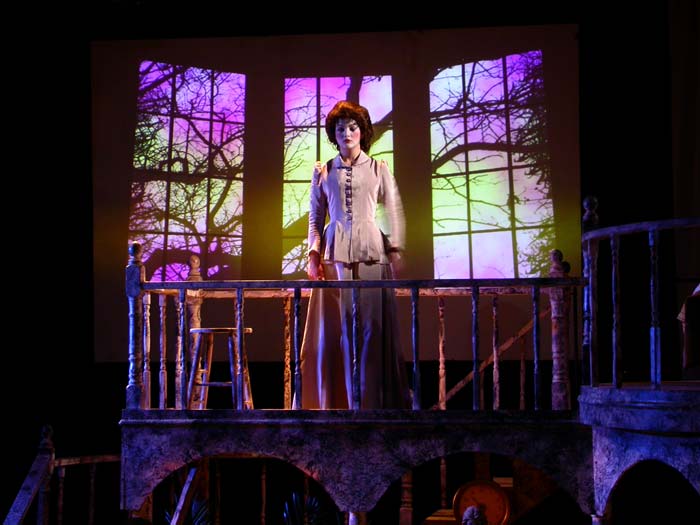
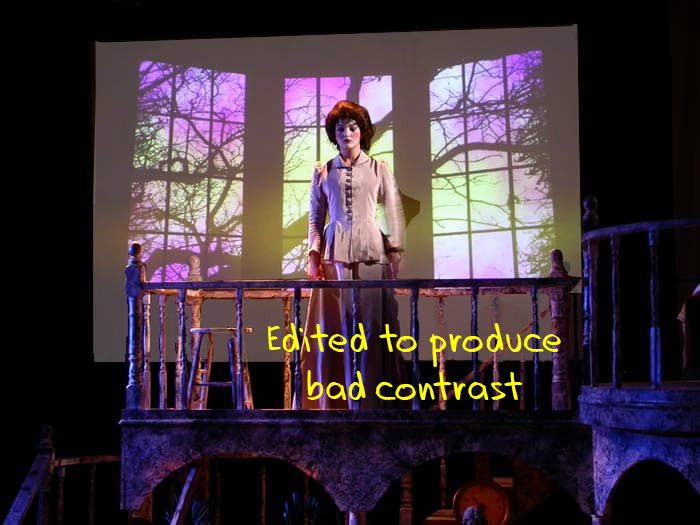
Whenever you can, put some distance between the actors and the screen. The example shown above for The Ghost Sonata includes a good eight feet of space behind that actress (her name is Melissa). The screen is hanging in the air, and there is no way that an actor can get close than maybe six feet to it. If Melissa were lit directly from in front of her, the light and her shadow would be all over that screen. Instead, the lighting designer (Neil Anderson) lit Melissa with a steep front-light, so that the light and her shadow pass under the screen without interfering with the projected image. The set design deliberately makes this possible, and the lighting designer deliberately works within these parameters.

Here is another projection-oldie for me, from 2007. This was a single-projector shooting from the front. Erik Barry, a Chicago-based designer, was a student here at the time, and worked this with me. Here, three actors are standing right up against the cyclorama. The projector is absolutely nothing special. Most of the action in the show happened in other parts of the stage, but a few moments like this one got really close.
Two things are going on here. First, the lighting for this moment is all high-angled side-light. You can see their shadows on the floor, and you can see the slight shadows on their faces due to the lack of front-light. This angle lets us light the actors without spilling lumens onto the screen.
The second thing going on is scenic. The lighting for any moment happening in this position, by necessity, will be different than the rest of the stage because of the proximity to the cyclorama. In order to make this work for the actors and for the director, the designer made that area elevated. Standing in that area is physically a different sort of space than the rest of the set. You cannot accidentally walk into it, and you cannot get to it without going up some stairs and doing a semi-elaborate cross. This means that it was always a different space than the rest of the set. The lighting there was a little different than other spaces, and that made perfect sense. If it had simply been another part of the kitchen, it would have felt weird whenever an actor went over there, moving from one lighting scheme into another. Because we started out treating it a little differently, it was never an issue, and the director was able to make good use of the full space.

Ellipsoidals become extremely important when you are lighting an actor who is very close to the projection surface. You can place an ellipsoidal offstage in the wings right at the end of a screen. Focus it straight through the area where the actor will be, but put it in very sharp focus. Push in a shutter-cut to eliminate the screen, with maybe a 12″ space in between the actor’s light and the projection surface. Keep this light off the floor as well, if you can! Bright light on the floor will scatter right back onto the screen.
It is really important to aim for zero light coming directly from the instrument onto the screen. This might feel really inconvenient to the lighting designer, but lighting a stage with projections is a different animal than lighting traditional scenery.
Rethink how the lighting is cued a little
Traditionally, lighting gets “bumped” for special moments in the show. When a scene is especially important or exciting, the lighting designer might choose to boost the levels to reinforce the energy in the scene.
This is not always the best choice when using projections. No matter how carefully the lights are focused, a stage that is flooded with light is likely to have an impact on the projections. The beautiful digital rendering that everyone loves is suddenly muddy and unimpressive. The animation of fire or lightning is still visible, but it no longer has any dramatic impact.
Lighting designers need to aim for their cues to boost excitement and interest. They might need to allow the projected media to contribute to time-of-day, or dramatic energy, or the music without necessarily pushing the lumens up on the stage. Some of the standard choices for lighting traditional scenery need to be let go so that the potential of light-based scenery can be reached. Instead of generally brighter, the lighting designer might want to consider boosting contrasts, or adding interesting elements, or activity to the lighting. Sometimes going dimmer is the best choice, if in doing so, they are able to hand over responsibility for increasing energy in that moment to the projection designer.
Ideally, the lighting designer and the projection designer will work out well ahead of time what the relationship between their two media will be. As technologies evolve in our industry, though, we must constantly revisit how we collaborate, and discuss what our norms are. We often get into trouble when we reflexively do things the same-old-way without recognizing that the ten-years ago method might limit what we can accomplish.
More of this content as well as rental projection media is available at http://scenicandlighting.com .
Next:
Projections on Stage Part II: Making Good Use of Ordinary Projectors
Related: More Information on the Theatre Program at Plymouth State University
 Random Item