This is part two of a series. The first part is Projections on Stage Part I: How do I make them brighter?
Design the set around the screens
It is easy to think of projections as being just the background behind the set. An important thing to consider is that this is just one of many ways that you can use projections on stage. Let’s start there, though, because that is the most prominent way that they tend to be used.
The cyclorama is a very powerful and useful place to put projected images. Do not forget how part I of this article started: spreading butter on toast. You might not want, by default, to fill your entire cyclorama with one projector. The more you spread the light of your image around, the weaker it all becomes.
If your goal is to create a background, here is a toolbox of things you can do to boost the visibility and quality of your projected media.
- Use one big, bright projector
- Use a regular projector and light your stage carefully, almost like a dance concert
- Use multiple projectors tiled together to fill the cyc
- Shrink the size of your projected area down and fill in around it with traditional scenery, or gobos, or shadows, or some combination of these.
Let’s look at a single projector illuminating a big screen upstage. Let’s suppose that we have a projector that outputs 4000 lumens. That’s a little brighter than the typical classroom projector, but not unusually bright for a typical school or small theatre.
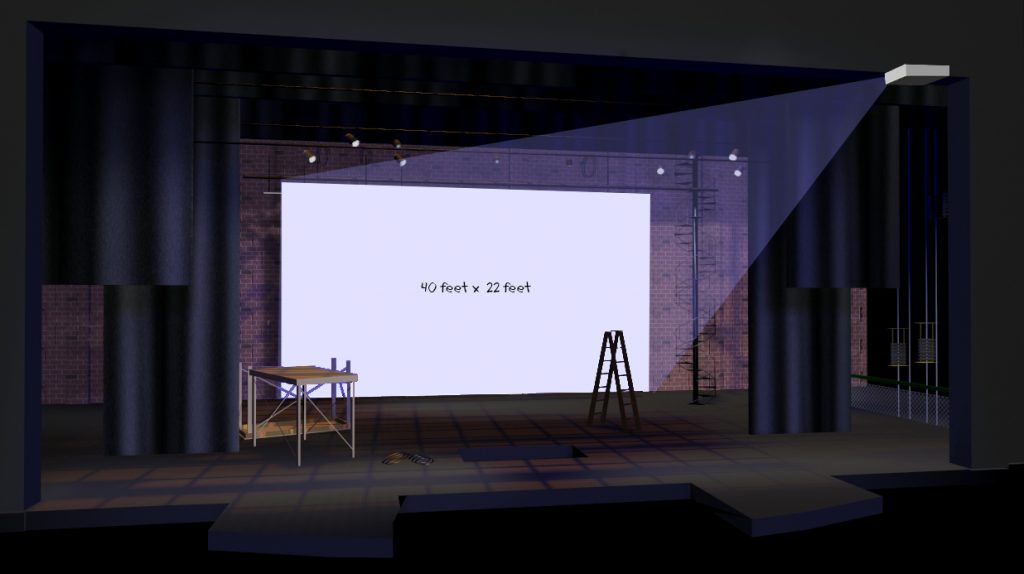
BRIGHTNESS: JUST OVER FOUR FOOTCANDLES
In the space shown above, the screen is 40 x 22, or 880 square feet. 4000 lumens distributed over 880 square feet is just over 4½ lumens per square foot.
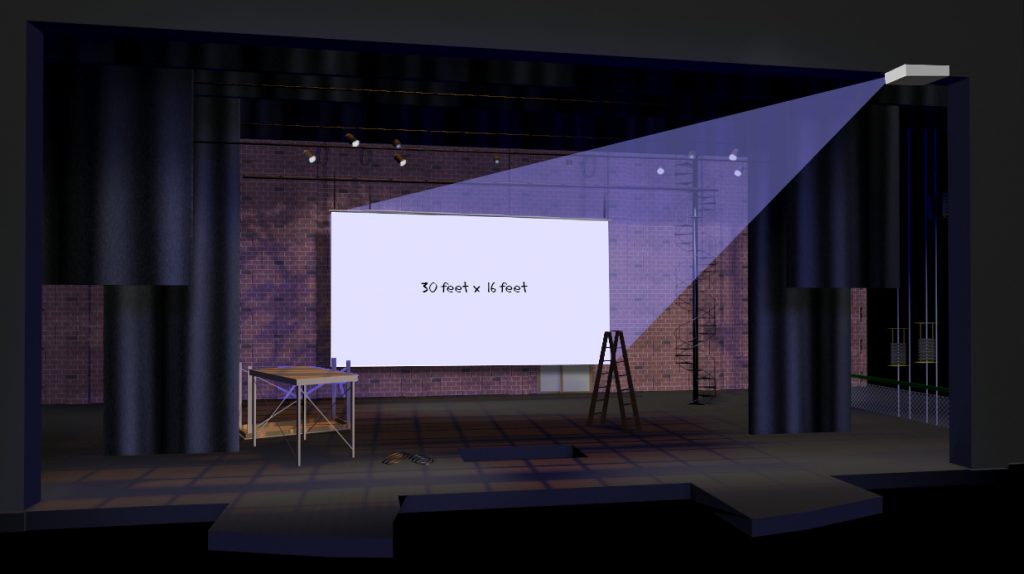
BRIGHTNESS: OVER EIGHT FOOTCANDLES
Here we have reduced the size of the screen down to 30 x 16, or 480 square feet. It still dominates the stage composition nicely. Notice that we have cut the surface area almost in half, though. Our image brightness is now more than 8 lumens per square foot – almost twice as bright as the previous setup.
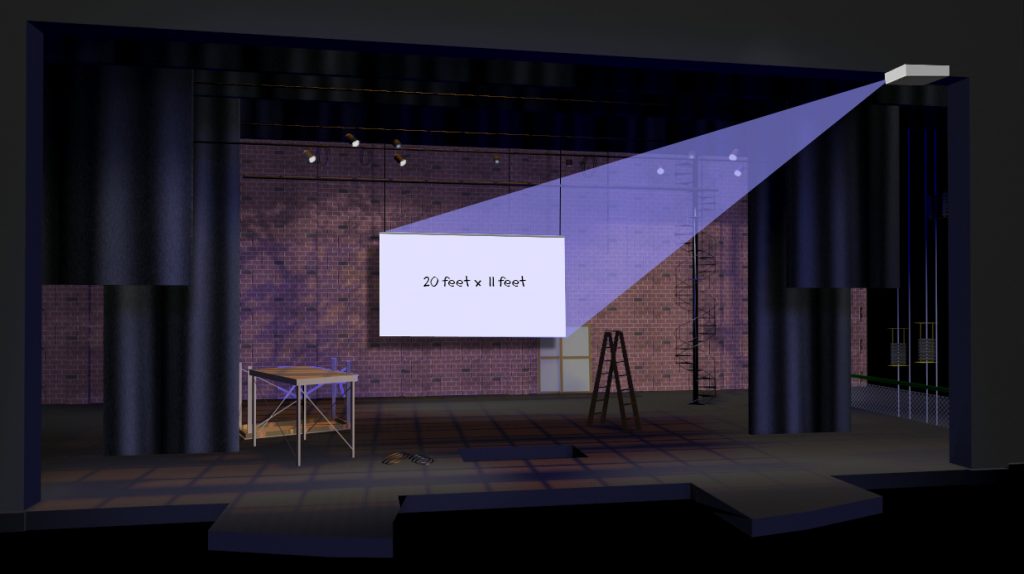
BRIGHTNESS: OVER 18 FOOTCANDLES
This screen is 20 x 11, or 220 square feet. The same projector will give us over 18 lumens per square foot. That’s four times as bright as the screen that we started with. By reducing our screen to half the width and half the height, we are spreading out light over only one-fourth of the area.
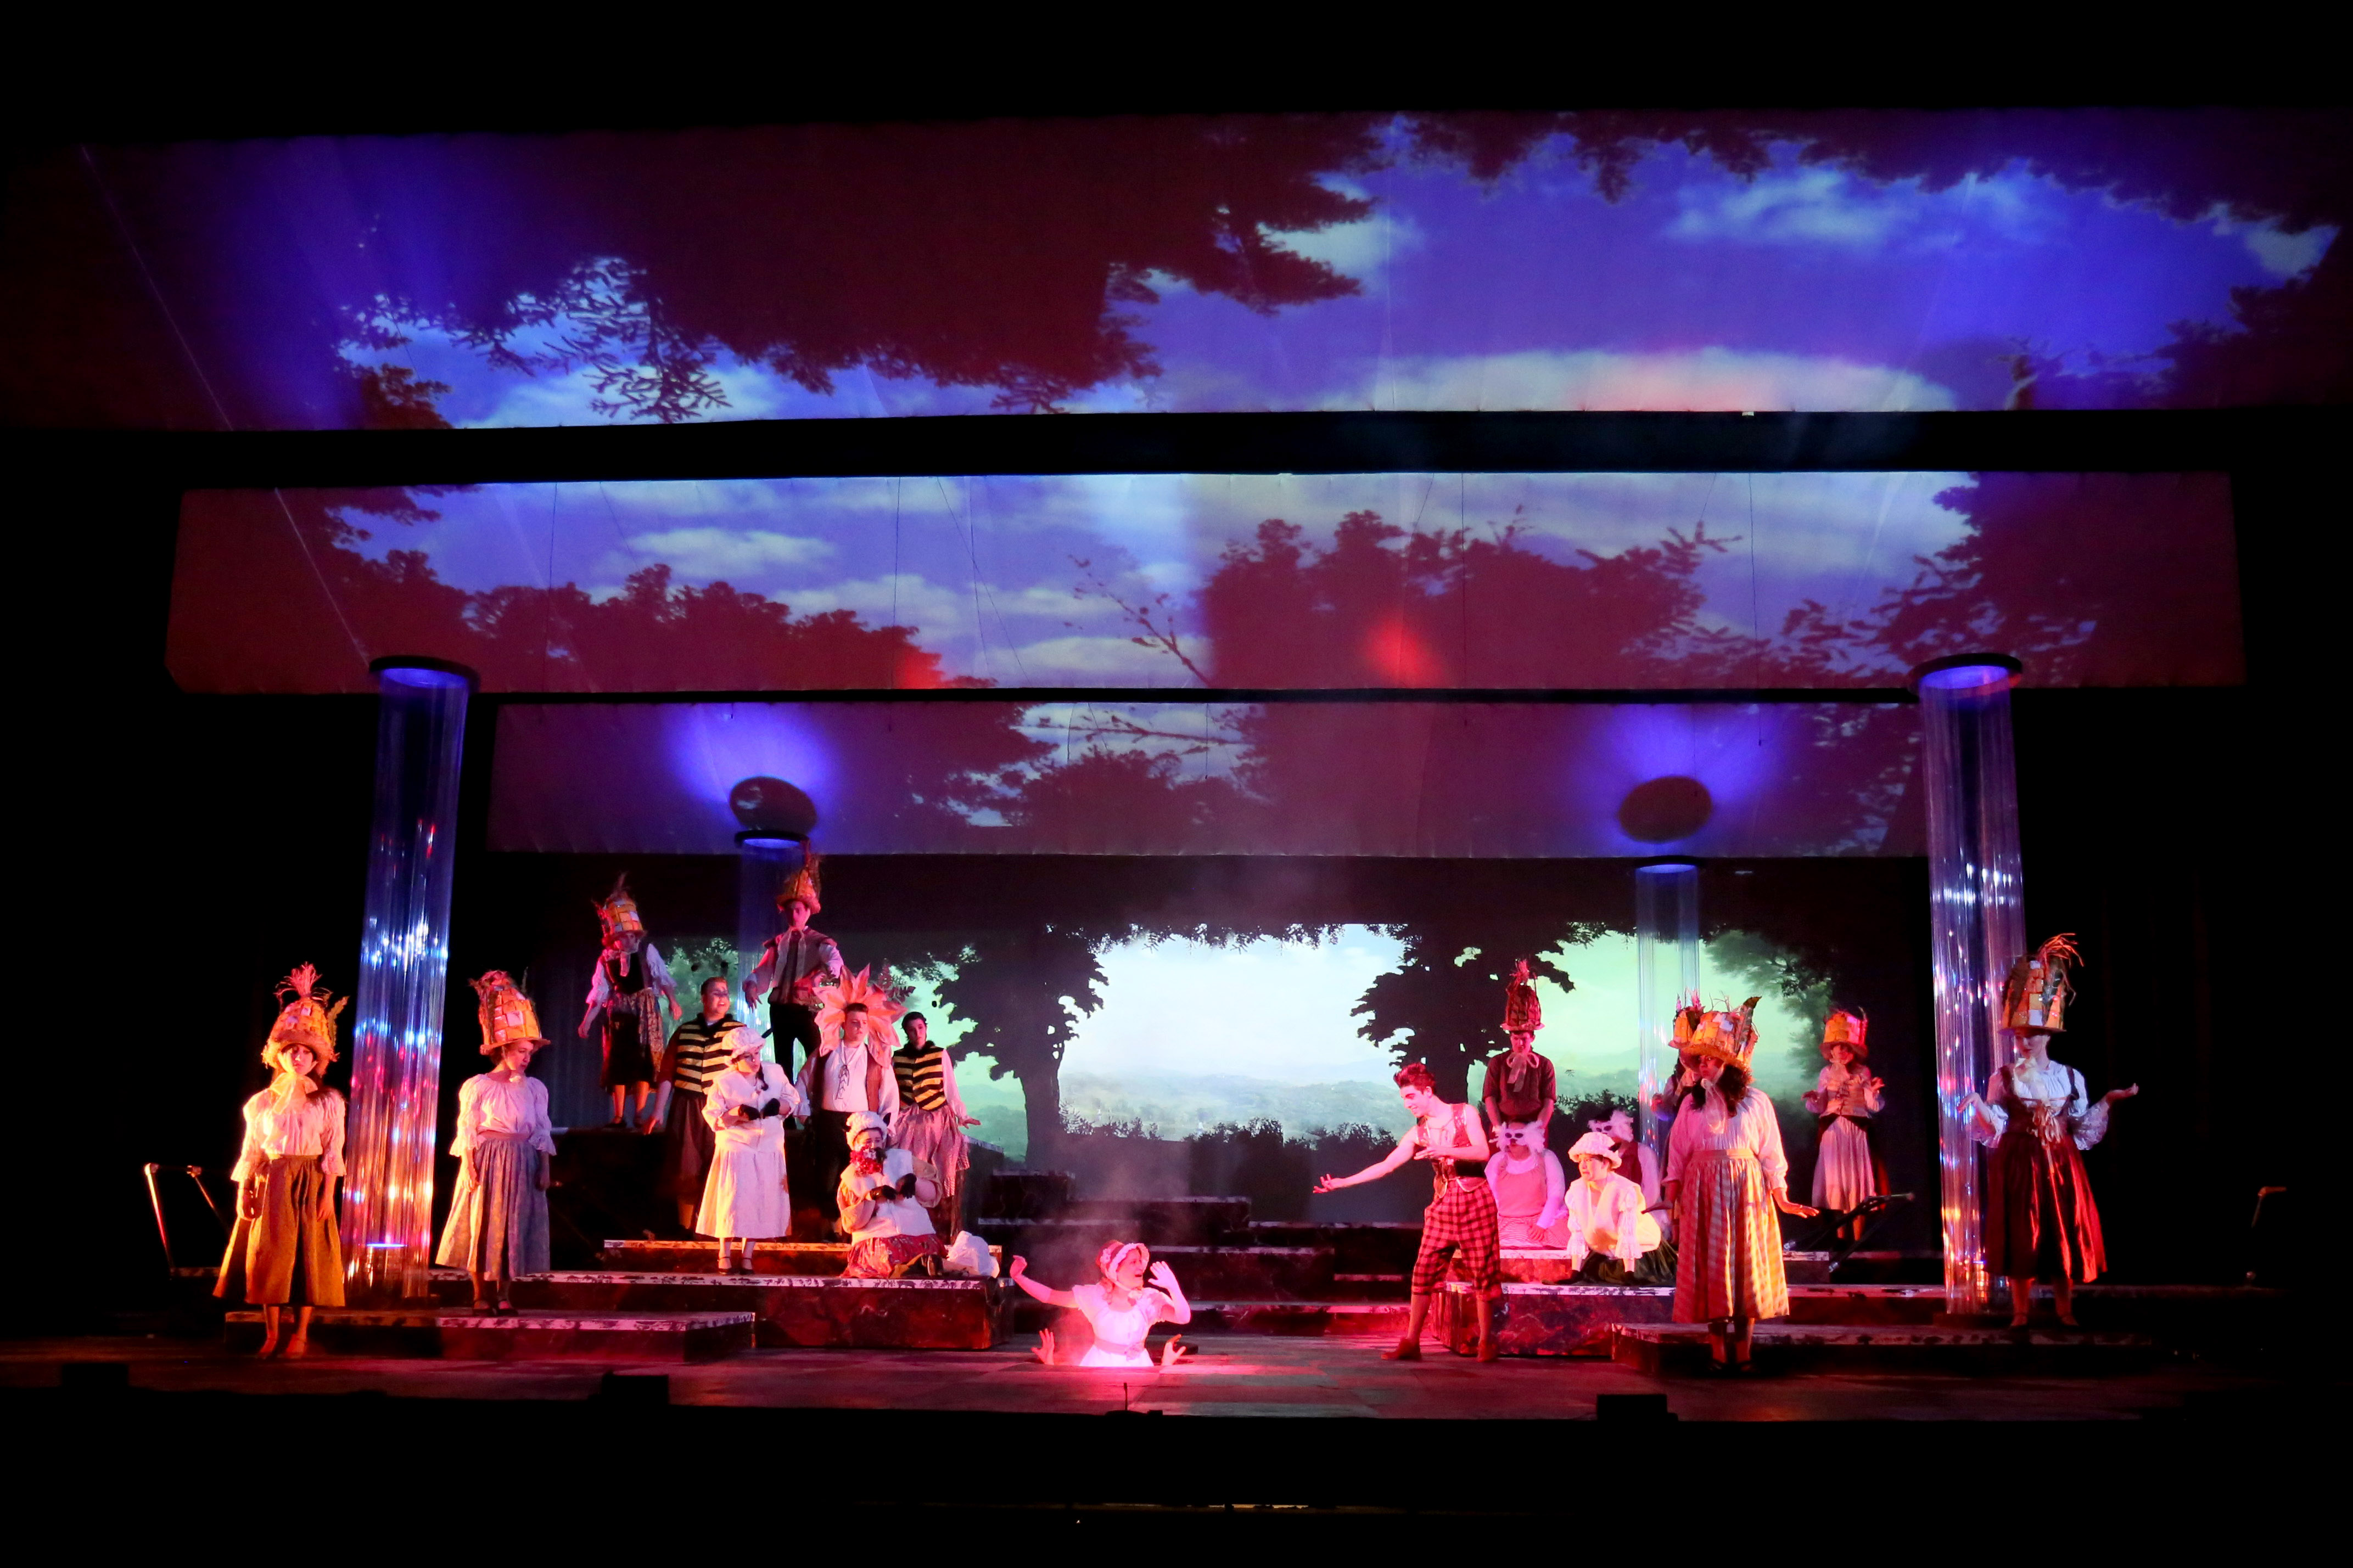
On a big empty stage it looks a little small, but if you built some scenery right up to it, it would look a lot more impressive. It is quite a large thing compared to an actor. Below is a part of a design I did for a children’s theatre company in 2007. The show was Disney’s Beauty and the Beast.


This was produced in a theatre with a very low proscenium and extremely limited fly-space and wing-space. The solution was to create “story-book” units, where painted flats could be paged to reveal castle, village, or forest. The exact location within each of those semi-generic settings was established using the projection screen up-center.

The advantage of this arrangement is that the screen does not need to completely fill the background. It only completes it. There were stairs leading up to the screen, reducing the need for it to be tall. The moving flats framed it nicely, requiring it to fill only a third or less of the width of the space. This screen ended up being about 12′ x 9′, or 108 square feet; a very modest size. It’s placement up-center gave it importance and prominence. Though we still lit the stage around it very carefully, our very ordinary projector was completely up to this task.
Combining projections with other media: A mixed-media screen

In the image above, the cyclorama has full-stage media. However, the projector being used was a simple and old 1000 lumen projector. It was on the floor behind the cyc and was bounced off of a four-foot wide mirror onto the cyc, creating rear-projection. The total image was about ten feet wide. In the image above, it is being used to create the moon. In other parts of the show, it also provided clouds or stars. The blue light, the ruined buildings, and the tree shadows are created using stage lighting and shadows.

The set design included plywood cutouts shaped like ancient ruins that were placed behind the cyc, very close to it. It also included thin tree-branches and thin netting with leaves and twigs woven through it. These elements were all behind the cyclorama at the left and right ends. Floor-mounted lighting instruments, some with tree-gobos, were focused through these scenic elements, so that in addition to the moon or other media, there was also a lot of interesting shadow elements and textures that could be created.

Using multiple projectors on one cyclorama: How to Shamelessly Cheat
There’s a lot of software and a lot of hardware out there that lets you overlap projection fields and let them act as one image. QLab can do this running from a Mac (if you buy the right software package). My favorite is a product called Dataton Watchout. The cost of these solutions ranges from a few hundred dollars up to many thousands.
When we overlap two projection fields and merge them seamlessly, we are blending them. This is where the middle-school music director who got drafted to direct the show hits a brick wall. This sort of equipment and software can produce magic. It also requires some capital investment and a time commitment towards making it work well. I’ll get into some of these solutions later. Right now, I am going to show you how to shamelessly cheat.

This is a production of Orpheus in the Undeworld from 2013. Not long after this production, our institution upgraded our systems to Dataton Watchout, which has seriously expanded our capabilities. At the time of this production, we relied a lot on innovation and ingenuity.
This comic opera includes four settings: The city of Thebes, a pasture, Mount Olympus, and The Underworld.
Our space has huge shiny metal acoustic shells that can be unfolded, turning the theatre into an excellent space for music. For this show, we chose to use this feature and avoid microphones. To integrate this choice into the design, we covered them with white stretch-fabric and projected on them from the house. This was a big part of the visuals for the show, but for the current topic, I want to point out what is happening across the back on the cyclorama under the acoustic shells.
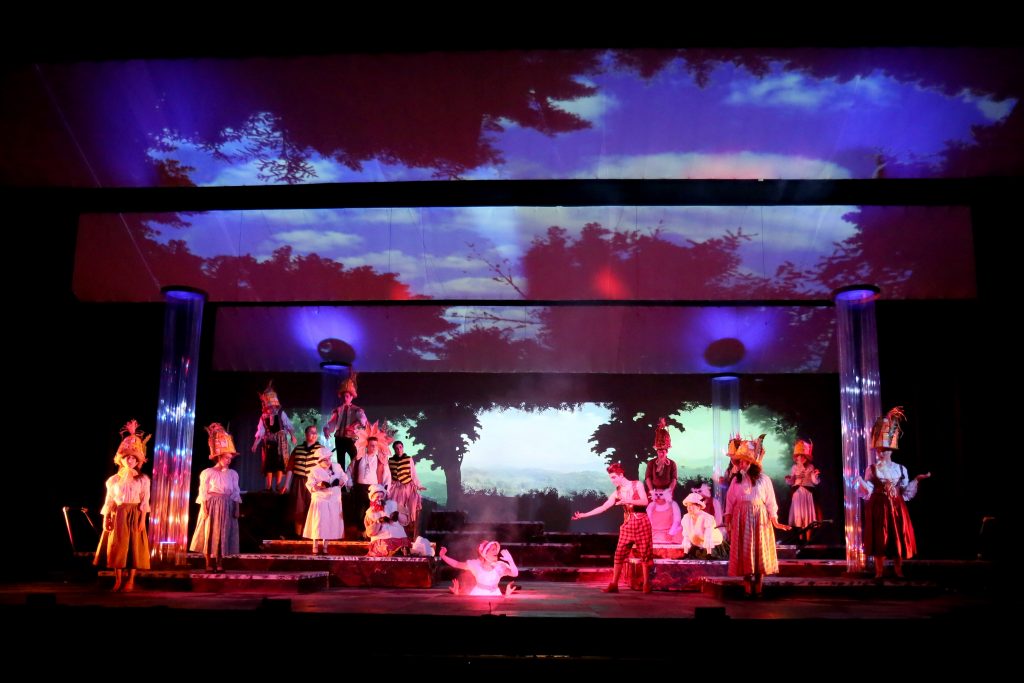
We had nice bright projections on the cyc back there. There are three projectors hanging on the back of that last sky-panel, each pointed at the cyc. We were running this show using basic ordinary PowerPoint.
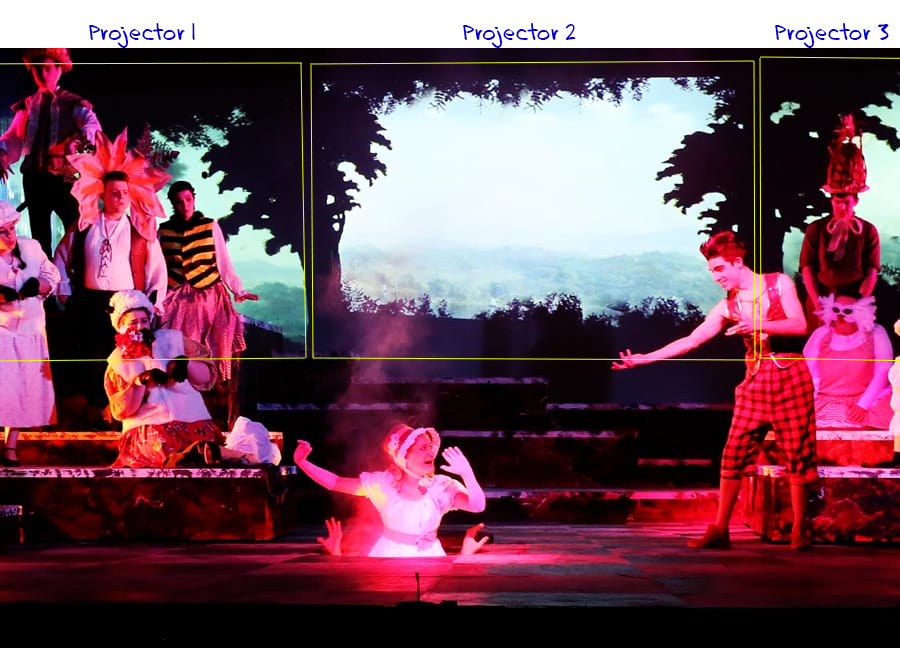
In order to make the images blend together, we simply included a black element at each point where the projection fields met. Sometimes it was a tree. Sometimes it was stalactite. Or a building, or empty sky. I designed each panorama deliberately with something black THERE and THERE, so that I could cut it up later and put it into the PowerPoint file.

With care and precision, you can line up your projection fields almost down to the pixel, leaving nothing but a thin dark line where they meet. These photos are from a production of Dirty Rotten Scoundrels, and used two projectors meeting exactly at center-stage. Above, there is a curtain-edge landing exactly at center. Below, part of a marble column peeks out from behind a drape, and the shadow of the column is the seam between the two fields.

You can see many more photos of the projections from this show here.
There are a few ways to get PowerPoint to function with multiple projectors. We used a special add-on for this show that allowed us to run three projectors from one computer. There are gadgets that will send a signal to multiple projectors while convincing your computer that it is talking to only one screen. PowerPoint all by itself will not allow you to send your images to more than one screen output.
You can also do the very simple thing, and put one computer connected to each projector. If your fade times are longer than one second, this works just fine. For many schools and small theatres, it is easy to borrow several old laptops. Nobody cares how you made your tech happen; they just care about the wow-factor of your show.

This is Pippin, in 2011. This was just before the American Repertory Theatre Production that went on to Broadway. This was not a main-stream show at that time. Director Morgan Murphy wanted a technology-based production that did not completely let go of the medieval era. Personally, I wanted to resist the common choice of placing projections behind the set and behind the actors. I wanted them to be a part of the set, and have the actors move among them.

I feel that projections often create a wide, shallow playing space for theatre, restricting the director to actor compositions that are reminiscent of 19th century plays produced using footlights. We line the actors up across the stage in front of a backdrop, and let them speak their lines.
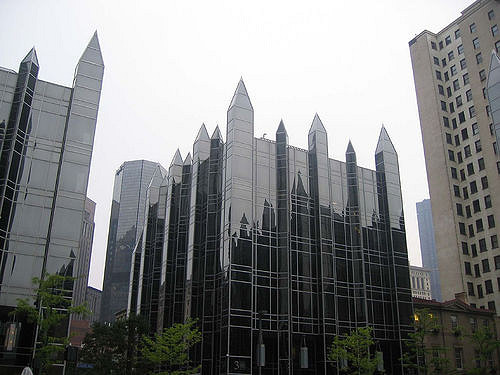
The inspiration for this design came from a spectacular building in Pittsburgh called PPG Place. It looks like a giant glass-and-steel castle. We mimicked its design, using black rear-projection screen instead of glass. Five projectors were placed behind the set and inside of it, allowing specific sections to become whatever we wanted them to be. None of the projection fields overlapped. Each was a stand-alone area. All together, they made up an amazing full-stage effect.
Each of the towers on the set had a color-changing light inside of it, allowing lighting designer Dan Hopper to dial up any color that he wanted.

The return on this design was that the actors literally stood on top of projection screens and in front of them. All of the media was rear-projected. None of the screens were larger than perhaps ten-feet by eight-feet. This was two years before Orpheus in the Underworld, above. The projections were controlled with five laptops and five projectors, synchronized with nothing but well-rehearsed cuing. Each of these projectors was a simple 3000 lumen classroom or conference-room projector.
I use this design regularly as a demonstration of how a set can be carved up into specific projection fields. Instead of tackling the entire set with one huge projector, it is often cheaper and better to create a design that allows many simple projectors to be used together.
More of this content as well as rental projection media is available at http://scenicandlighting.com.
Next:
Projections on Stage Part III: Choices about Screens
Related: More Information on the Theatre Program at Plymouth State University
 Random Item